Access Your Raspberry Pi Remotely With SSH: A Complete Guide
Ever found yourself needing to tinker with a Raspberry Pi, but its tucked away in a hard-to-reach spot or maybe even powering a robot? The ability to connect and control your Raspberry Pi remotely, without the hassle of a monitor, keyboard, and mouse, is not just convenient; it's often essential.
This opens up a world of possibilities, from managing a media server discreetly to remotely debugging code on a robot. The solution? Secure Shell, or SSH, a powerful tool that allows you to access the terminal of your Raspberry Pi from another computer on the same network, offering a secure and efficient way to manage your device.
Let's dive into the world of SSH on the Raspberry Pi.
Raspberry Pi and SSH: Key Technical Specifications
| Feature | Details |
|---|---|
| Primary Function | Remote access to the Raspberry Pi's command line interface (CLI). |
| Technology Used | Secure Shell (SSH) protocol, which encrypts all data transmitted between the client and the Raspberry Pi. |
| Advantages | Allows management from anywhere on the network, eliminates the need for a physical monitor, keyboard, and mouse, is secure. |
| Use Cases | Managing headless servers, controlling robots and embedded systems, remotely debugging software, and accessing IoT devices. |
| Security Considerations | Change default passwords, keep the Raspberry Pi's operating system updated, use strong passwords, consider firewall rules. |
| Operating System Compatibility | Works with all Raspberry Pi OS versions and many other Linux distributions. |
| Prerequisites | Raspberry Pi connected to a network (either via Ethernet or Wi-Fi), an SSH client installed on your access device (like PuTTY on Windows or the built-in terminal on macOS and Linux). |
| Enabling SSH | On Raspberry Pi OS Desktop: Enable through the Raspberry Pi Configuration tool under the Interfaces tab. On Raspberry Pi OS Lite: Enable during SD card flashing through advanced options. |
| Further Information | Official Raspberry Pi Website |
The core of remote access to your Raspberry Pi often revolves around SSH. Secure Shell (SSH) is an essential tool for anyone working with a Raspberry Pi, providing encrypted remote access to your device from anywhere on your network. This is crucial because it keeps the data traveling between your device and the Raspberry Pi safe from prying eyes.
Getting started is relatively straightforward. The simplest and most common way to access a Raspberry Pi remotely is via SSH (secure shell). You can access the terminal of a raspberry pi remotely from another computer on the same network. On recent versions of Raspberry Pi OS, SSH is disabled by default for security reasons.
Here's a breakdown of the essential steps and concepts:
Enabling SSH
The process for enabling SSH depends on the Raspberry Pi OS version and how you're using it. This is one of the first steps, and it sets the foundation for all remote access.
On Raspberry Pi OS Desktop: Enable SSH in the Raspberry Pi configuration tool under the interfaces tab. This is the simplest method for users with a graphical interface.
On Raspberry Pi OS Lite: Apply advanced options when flashing the SD card. During the SD card setup (using tools like Raspberry Pi Imager), enable SSH before the OS is even booted up.
The Importance of Security
Enabling SSH, while unlocking incredible utility, also demands a focus on security. The default settings of a Raspberry Pi, right out of the box, are not designed with security as the primary concern.
- Change the Default Password: This is the single most critical security step. The default password of the 'pi' user is well-known. Change it immediately to a strong, unique password.
- Regular Updates: Regularly update your Raspberry Pi to keep it secure. Software updates often include security patches that protect against newly discovered vulnerabilities.
Setting Up Remote Access
The goal here is to be able to control your Raspberry Pi from anywhere. Setting up your raspberry pi with a static IP and enabling remote SSH access is a great way to maximize its utility and securely manage it from anywhere.
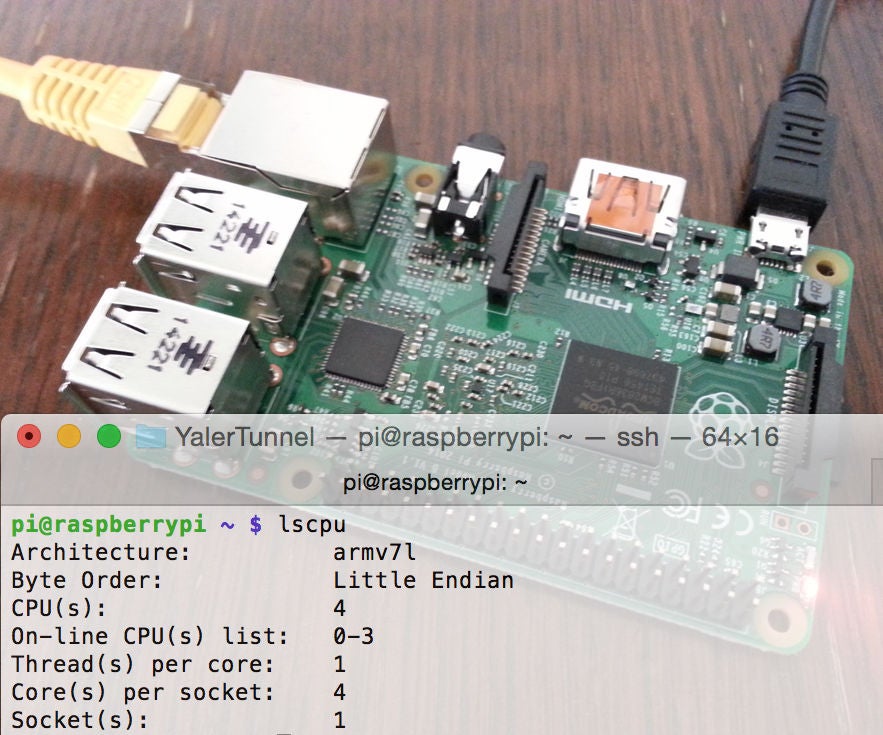
Finding the IP Address: To connect to your Raspberry Pi using SSH, you will need to know its IP address. You can find this by running the following command on your Raspberry Pi:
hostname -IThis command reveals the IP address assigned to the Raspberry Pi. If you are on the same network, you can now use this IP address to connect via an SSH client.
Beyond the Basics: Advanced Considerations
Remote access to a Raspberry Pi from a PC is a powerful and versatile tool that allows users to control their Raspberry Pi from anywhere in the world. The simplicity of SSH opens the door to many other possibilities.
- Port Forwarding: If you want to access your Raspberry Pi from outside your home network, you'll need to configure port forwarding on your router. Port forwarding redirects incoming traffic on a specific port to your Raspberry Pi's local IP address. Most routers support port forwarding, though the process varies depending on your router model.
- VPN: A Virtual Private Network (VPN) helps connect Raspberry Pi securely from anywhere by tunneling into your home network. This is a secure alternative to port forwarding, especially if you're concerned about security.
- Custom Tunnels: A custom tunnel allows you to access your Raspberry Pi SSH through pitunnel.com with an address like pitunnel.com:12345. Custom tunnels are created by entering a command in your Raspberry Pi terminal:
Tools of the Trade: SSH Clients
To use SSH, you'll need an SSH client. Fortunately, they are readily available on most operating systems.
- Linux and macOS: These operating systems have SSH clients built-in. You can simply open a terminal and use the
sshcommand. - Windows: One of the most common is to use an SSH client such as Putty.
Troubleshooting Common Issues
Even with straightforward steps, there might be hiccups along the way. Here are solutions for common problems:
- Connection Refused: This often means SSH isn't enabled, or there's a firewall blocking the connection. Double-check that SSH is enabled and that your firewall is configured correctly (or temporarily disabled for testing).
- Incorrect IP Address: Make sure you are using the correct IP address for your Raspberry Pi. Use the
hostname -Icommand on the Raspberry Pi itself to verify. - Authentication Failures: Double-check that the username and password are correct. Remember to change the default password!
The Future of Raspberry Pi and SSH
The combination of a small footprint, low energy demands of Raspberry Pi make it ideal for remote deployment. The trend toward the Internet of Things (IoT) is also making the Raspberry Pi and SSH increasingly important. The ability to remotely manage these devices is essential, and SSH provides the foundation for doing so securely and efficiently. Whether you are managing a media server, coding projects, or conducting system administrative tasks, ssh provides a robust toolset for secure and efficient remote management.
With the knowledge and the correct setup, you'll be able to manage your Raspberry Pi from anywhere, opening up new possibilities for experimentation, learning, and innovation.

